
NorthTech customer guide · Ness

How to use your Ness M1 Navigator keypad
Arm and disarm your Ness M1, change an existing alarm code and understand common keypad messages.
This guide is for a Ness M1 control with an M1 Navigator touchscreen keypad. The separate Ness Navigator guide is for D8/D16 panels, which use different code-change steps. Check your control panel or ask NorthTech if you are unsure which system you have. Areas, delays and optional keys depend on your installation.
Step 01
Start with the M1 Navigator
The screen shows the alarm's current state and the area this keypad controls. Check it before pressing any buttons.
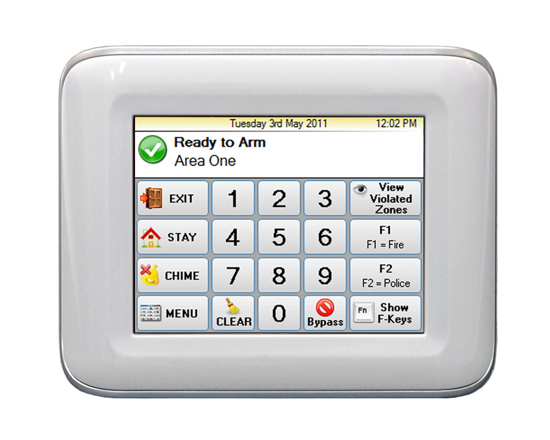
- Read the status. Ready to Arm means the area is ready. If a fault or alarm message appears, read it before changing the alarm state.
- Check an open zone. Tap View Violated Zones to see a door, window or other zone reported as open or unsealed. Check the named zone before arming.
- Know the Menu button. Menu opens functions including Change User Codes, History Log and Zone Status.
F1, F2 and other function keys may perform actions set by the installer, including emergency calls. Do not press them to explore or test the screen. Ask NorthTech what they do at your property.
Step 02
Arm and disarm
Use your own alarm code. This is separate from your NorthTech website login.
- Arm when leaving. Close protected doors and windows and check the area is ready. Enter your alarm code. Leave by the usual exit door before the exit delay ends, then check the expected armed state.
- Arm while staying inside. When the area is ready, enter your alarm code and tap Stay during the exit sequence. Check the keypad shows the expected Stay state.
- Disarm on entry. Go to the keypad by the usual entry route. Enter a valid alarm code before the entry delay ends. Confirm the armed state clears.
Quick arming, automatic Stay and extra Stay modes are optional installer settings. If the screen does not show the state you expect, ask NorthTech before relying on it. Avoid bypassing an unexplained open zone; bypassed detection cannot trigger an alarm during that arming period.
Step 03
Change an alarm code
You need a Master level alarm code. An ordinary arming code may not have permission to change other codes.
- 1Open the menu.Menu → Change User CodesChange User Codes appears on the first page of the M1 Navigator's Main Menu.
- 2Authorise the change. If the Authorise screen appears, enter your Master level alarm code.
- 3Choose the right person. Use Next User or Previous User. Check the displayed name or alarm user number before continuing.
- 4Enter a new code.Change Code → new unique codeUse four digits, or six digits if your M1 has been set up for six digit codes.
- 5Finish privately. After the keypad accepts the change, close the menu and give the new code to the person through a private channel.
If Change User Codes will not open, check that you used a Master level code. If the person is not listed, the installer may need to enable their code position. Do not guess codes or send NorthTech an alarm code in a support request, email or keypad photo.
Step 04
Understand messages and menus
- An open zone remains on screen. Tap View Violated Zones and check the named door or window. If it looks closed and the message remains, note the exact zone name for NorthTech.
- A fault or trouble appears. Write down the exact message and when it appeared. Do not open the alarm cabinet or disconnect its battery. Ask NorthTech to check a message that remains.
- An alarm has sounded. When safe, enter your code to silence and disarm. The keypad may keep showing the cause until you enter the code again to acknowledge it. If monitored and you know the activation was accidental, contact your monitoring centre promptly.
- Find more detail. Use Menu, then History Log for recent events or Zone Status for the current state of each zone. Keep the history available when reporting a fault.
Select Area, Automation, Walk Test and Smoke Detector Reset depend on your installation. Ask for property-specific instructions before using them. Leave System Settings and System Tests to NorthTech.
Need a hand?
Tell us which keypad or area is affected and the exact message on screen. Do not send an alarm code or a photo showing one being entered.
Request supportPrepared by NorthTech using public Ness help. This is not an official Ness publication. Reviewed 3 November 2026.
Manufacturer references