
NorthTech customer guide · Ness

How to use your Ness Navigator keypad
Arm and disarm your alarm, enter User Program Mode and change a user PIN on supported Ness control panels.
Check your control panel first. This guide is for D8x/D16x Deluxe V8.0+, D8XCEL/D16XCEL 3G V10+, and D8XCEL/D16XCEL 4G V11.3+ only. The Navigator keypad alone does not identify your panel. Do not follow these steps for DPlus or other panels. If unsure, ask NorthTech before changing codes.
Step 01
Arm and disarm
Use your own authorised code. Do not share PINs or photograph a screen that displays a code.
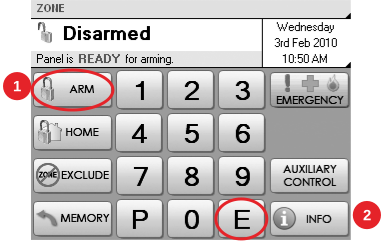
- 1ARM starts normal arming.
- 2E confirms your entry.
- Check the system is ready. Close protected doors and windows, stop movement in detector areas and check the screen says ready.
- Arm when you leave.ARM → your user code → ELeave by the agreed exit route before the exit delay ends. Check the expected armed indication for your system.
- Disarm when you arrive.Your user code → EEnter through your usual entry door and disarm before the entry delay ends. Check the screen returns to Disarmed.
The HOME button is optional. Only use Home Mode if NorthTech has explained which zones remain active. If a warning sounds or the system is not ready, check the cause; do not exclude zones just to clear a warning. If you mistype, press E and start again. Do not keep guessing: five incorrect entries can cause an alarm. An Arm Only code cannot disarm.
Step 02
Enter and exit User Program Mode
Use your existing Master code for customer code changes. Installer Program Mode is different and is not needed for these steps.
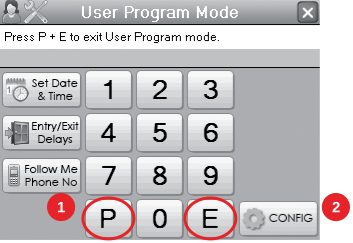
- 1P begins a programming command.
- 2E confirms it.
- Start with the alarm disarmed. Use the normal Disarmed screen, not Armed or Home Mode.
- Enter User Program Mode.P → your Master code → EYour Master code is the current code assigned to User 1. Check the screen heading says User Program Mode. If it does not, stop rather than try other programming codes.
- Exit User Program Mode.P → ECheck the normal Disarmed screen returns. Exit explicitly when finished; the panel also leaves this mode after four minutes of keypad inactivity.
If the Master code is unknown, stop and contact NorthTech. Do not guess codes, reset the panel or open the alarm cabinet. Do not use CONFIG, the X button or an installer sequence as a substitute. Leave timers, telephone numbers and other settings unchanged.
Step 03
Change a user code
First enter User Program Mode as shown above. Confirm which user slot you are changing before entering a new PIN.
Choose the correct user slot
- User 1 and Master code
- 201
- User 2
- 202
- User 3
- 203
- User 56
- 256
These are programming option numbers, not PINs. Options run from 201 to 256. For example, select User 2 with P, 202, E. Do not type the word ‘User’.
- Choose a suitable PIN. Use 3 to 6 digits. Do not start with 0. Every code must be different; a code similar to an existing one may also be rejected.
- 1Select the user slot.P → option number → ECheck the displayed user number is the one you intend to change.
- 2Enter the new PIN.Your new PIN → EType your chosen 3 to 6 digit PIN, then E.
- 3Confirm the same PIN.Your new PIN again → EEnter exactly the same PIN again. The new code is displayed on screen, so keep it private.
- 4Exit and check.P → EConfirm the screen returns to Disarmed. Arrange a safe check of the changed code. If it is rejected or you are unsure, contact NorthTech before leaving.
User 1 is the Master code. If you change option 201, use the new Master code the next time you enter User Program Mode. Keep it secure. Do not overwrite an unknown slot, radio key or access card assignment. Ask NorthTech if you are unsure who uses a slot or what permissions it has.
Need a hand?
Tell us your control panel model and what the screen says. Do not send us your PIN or a photograph showing it.
Request supportPrepared by NorthTech using public Ness help. This is not an official Ness publication. Reviewed 2 November 2026.
Manufacturer references